Unsigned 2-bit binary converter with Arduino
Overview
Overview
Keywords: Arduino, 2-bit, unsigned binary, binary to decimal conversion, digital input, digital output, breadboard, circuits, Tinkercad
Age group: 14-17
Required knowledge/skills: Basic electronics, Arduino programming, circuit design, working in tinkercad.com virtual environment, basic understanding of quantum concepts
Time frame: 1-2 hours per simulator: assembling the circuit in Tinkercad and uploading simple Arduino code to the microcontroller
Authors: Astrinos Tsoutsoudakis (GR)
We're going to take a journey into the secret language of computers: binary. Everything a computer does, from showing a picture to playing a song, is based on just two simple numbers: 0 and 1. This is the fundamental language of all digital electronics.
Our activity today is a fantastic hands-on project that will make this idea come to life. We're going to build a device that acts like a translator. We'll speak to our Arduino in its own language, binary, and it will translate what we say into a language we better understand: decimal numbers.
Imagine we have 2 light switches in a row. Each switch can be either on (1) or off (0).
- The first switch (on the far right) is special. It has a value of 1.
- The next switch has a value of 2.
By flipping these switches, we can create any number from 0 all the way up to 3!
Our project will use a series of switches to create these binary numbers. We'll then use our Arduino, a tiny but powerful computer, to read these switches, do a little bit of math in a flash, and then display both the binary and the decimal number on a screen.
2-bit binary to decimal
| Binary | Decimal |
| 00 | 0 |
| 01 | 1 |
| 10 | 2 |
| 11 | 3 |
Required materials
- Software: Arduino IDE
- Online tool: www.tinkercad.com
Hardware
| Name | Quantity | Component |
|---|---|---|
| U1 | 1 | Arduino Uno R3 |
| U2 | 1 | MCP23008-based, 32 (0 x 20) LCD 16 x 2 (I2C) |
| S1/S2 | 2 | Slide switch |
| R1 / R2 | 2 | 10 kΩ Resistor |
Tasks for teachers
- Set up Tinkercad classrooms, provide Arduino code templates, circuit diagrams.
- Introduce binary to decimal number conversion. (Introduction to Binary)
- Help students place components correctly: resistors, button or slide switches, LCD display.
- Support coding activities.
- Encourage inquiry and discussion.
- Use short quizzes, discussion, or mini presentations to check comprehension.
Tasks for students
- Learn basic electronics and coding.
- Assemble the circuit in Tinkercad, upload and modify code.
- Document the project and present findings.
- Think creatively about how to suggest improvements.
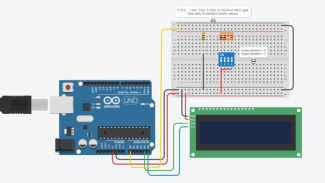
The circuit realized in tinkercad.com virtual environment
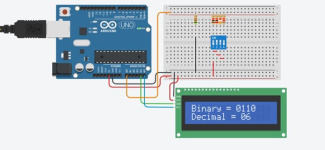
The circuit realized in tinkercad.com virtual environment
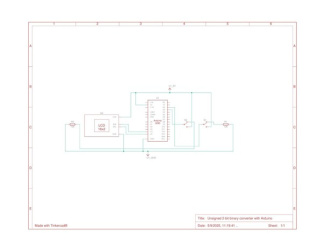
Schematics of the circuit
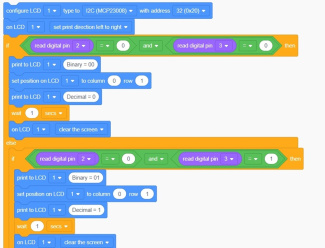
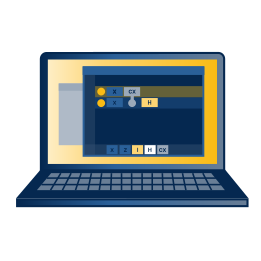
Part of the Code in Blocks
You can find the Tinkercad design to reuse here.
Share this page