The 3 Rs - Keratin

Overview
Overview
Keywords: bio-based products biomass
Disciplines: biology, chemistry, economics
Age level of the students: primary and secondary (all units have a main lab activity for primary and one for secondary students)
Time frame: 45 - 90 minutes per activity
Partners: involvement of researchers to present a lesson for the students or visit to an industry that produces bio-based products
![]()
![]()
![]()

The idea
The project is designed to re-use wool, which could be a source of pollution if not disposed of properly. In many European Union countries, wool is considered a raw product without an adequate range of applications.
Wool
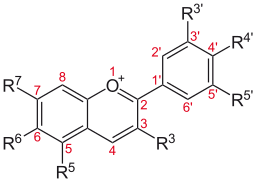
Wool is a natural textile fibre that is obtained primarily from the fleece of sheep, some types of goats and rabbits. From a morphological point of view the wool fibre is made up of an external layer composed of flat overlapping cells, an internal structure and a pith. From a chemical point of view wool fibre is a protein polymer composed of keratin. Keratin is a structural protein, consisting of long chains of amino acids and has a high concentration of cysteine. It forms the hair, wool, feathers, nails and horns of many types of animals.
The following experiments show that you can use wool to create other useful materials.
Microscopy
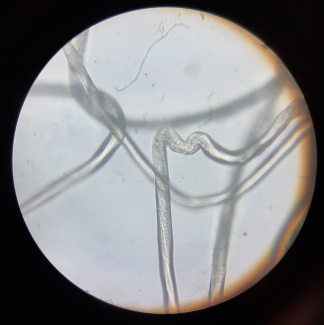
A good introduction is to compare wool and synthetic fibres under a microscope.
The microscopic observation of fibres can be used to distinguish natural fibres like wool, cotton, or linen from synthetic man-made fibres. You can differentiate them by comparing the longitudinal view and cross-sectional view.
In longitudinal view, wool appears cylindrical, irregular, has a rough surface and scale-like structure, and a dark medulla may appear on coarse wool fibres. In cross-sectional view, wool looks nearly round or circular, and a medulla may appear.[3]
In case you don’t have access to a microscope, here are some pre-made examples of alpaca and cashmere wool fibre, natural linen fibre, synthetic polyester, and viscose.
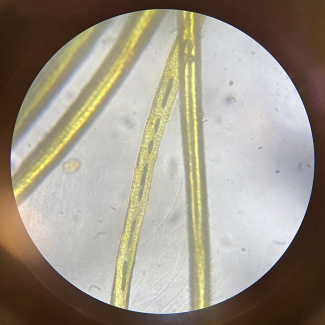
Alpaca wool (1) under a microscope
Alpaca wool (2) under a microscope
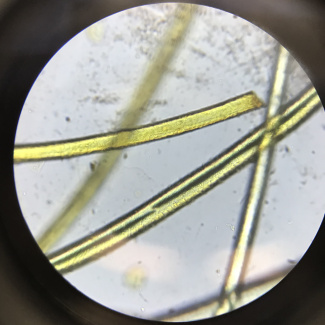
Cashmere wool under a microscope
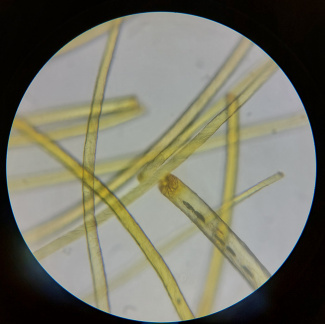
Natural linen under a microscope
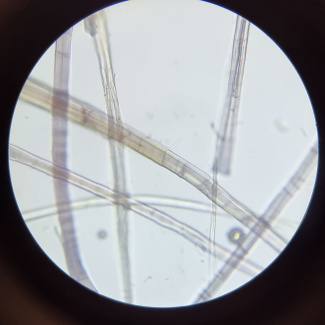
Synthetic polyester under a microscope
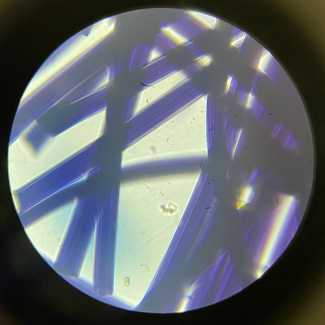
Viscose fibre under a microscope
Objective: observing textile fibres under a microscope
Materials: microscope slide, coverslip, tweezers, scalpel, textile fibres (cotton, wool, silk)
Solutions: distilled water, Lugol’s solution
Procedure
- Unthread a tissue sample with a scalpel and tweezers so that you get a few isolated fibres.
- Place these on a microscope slide, add a drop of water or reagent and cover with the coverslip.
- Place the slide on the stage of the microscope, focus and observe.
Results
The students can describe what they see and identify the origin of the fibres using the diagram.
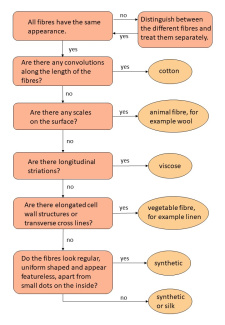
You can download the identification sheet here as docx and as pdf file.
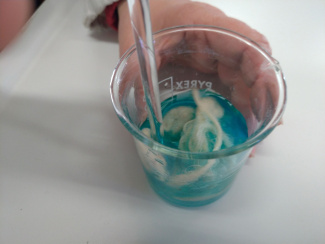
Keratin extraction and making a hair conditioner
In a chemistry lab, you can make a keratin extraction to explore the components of wool.
The experimental activity consists of:
- the extraction of keratin from wool using a suitable extraction solution;
- keratin flocculation using a protein denaturing agent;
- recovery of keratin powder by decantation or centrifugation.
Below you find a complete guide. You can download a presentation with example images from the procedures to use in class as pptx or pdf.
Materials
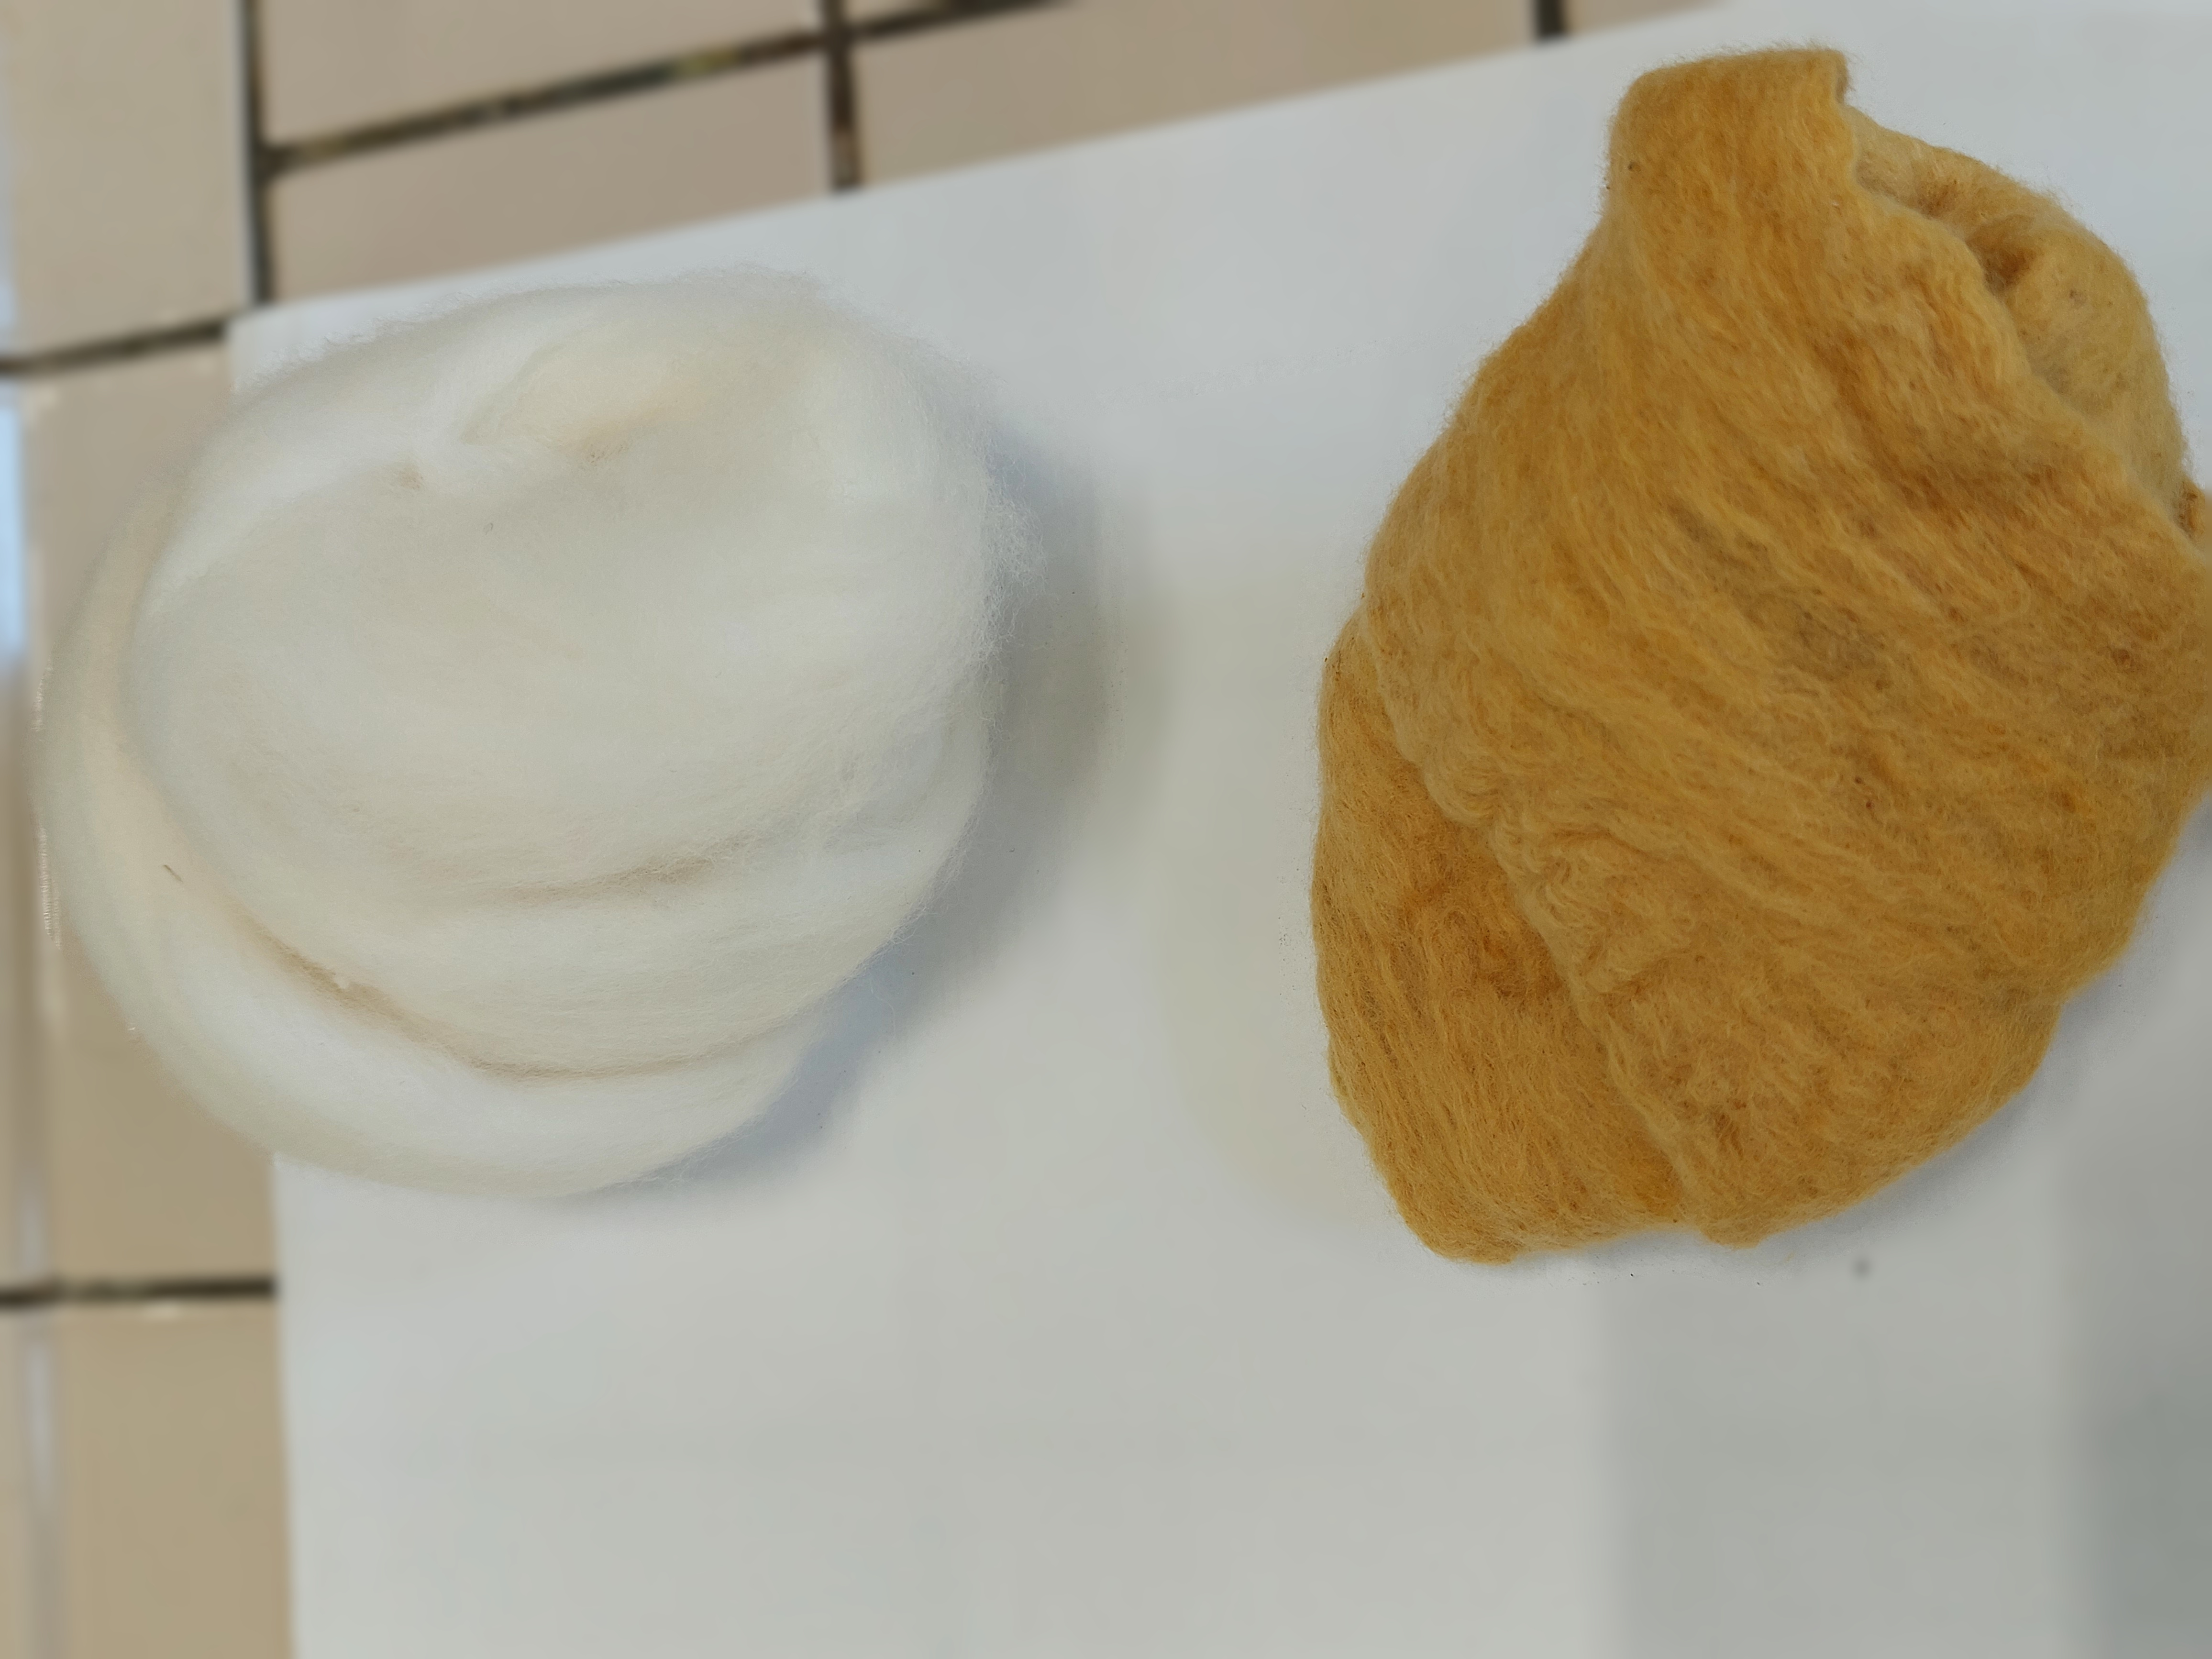
- Rough wool fibres. The wool must be untreated, raw and undyed to avoid the treatments altering the results.
- Sodium hydroxide (NaOH), use a 1.0 mol/L (M) solution. If time permits, wait for 2 hours before the extraction of the keratin. If it is not possible to wait, a period of 30 minutes already allows you to have a sufficient result.
- Beaker
- Glass rod
- Gloves
- Lab coat
- Protective goggles

Method
Safety first: Wear protective gloves, a lab coat, and goggles.
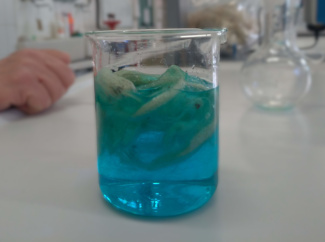
Put the wool fibres in a beaker. Cover them with the sodium hydroxide solution and mix the mixture with the glass rod. Make sure that the wool is completely covered by the extraction solution. Let it stand for a few hours.
The indicated time (ideally 2 hours or at least 30 min) refers to the hypothesis of a 1.0 M solution; alternatively, a less concentrated solution (0.5 M) can be used and of allowed to rest overnight.
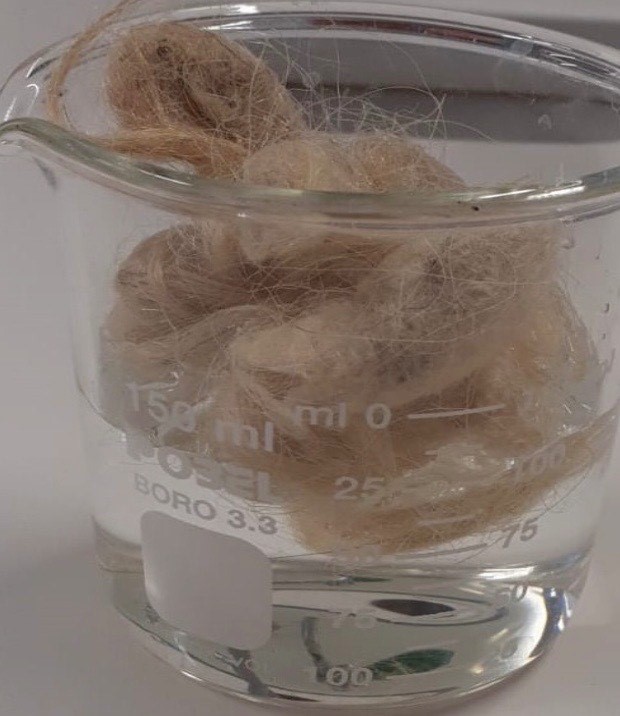
Extract a part of the fibres from the extraction solution and observe their appearance.
You can plan various lab experiments with the students using different solutions and different times for the extraction. The students can compare the results.
Results
-
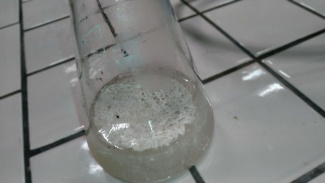
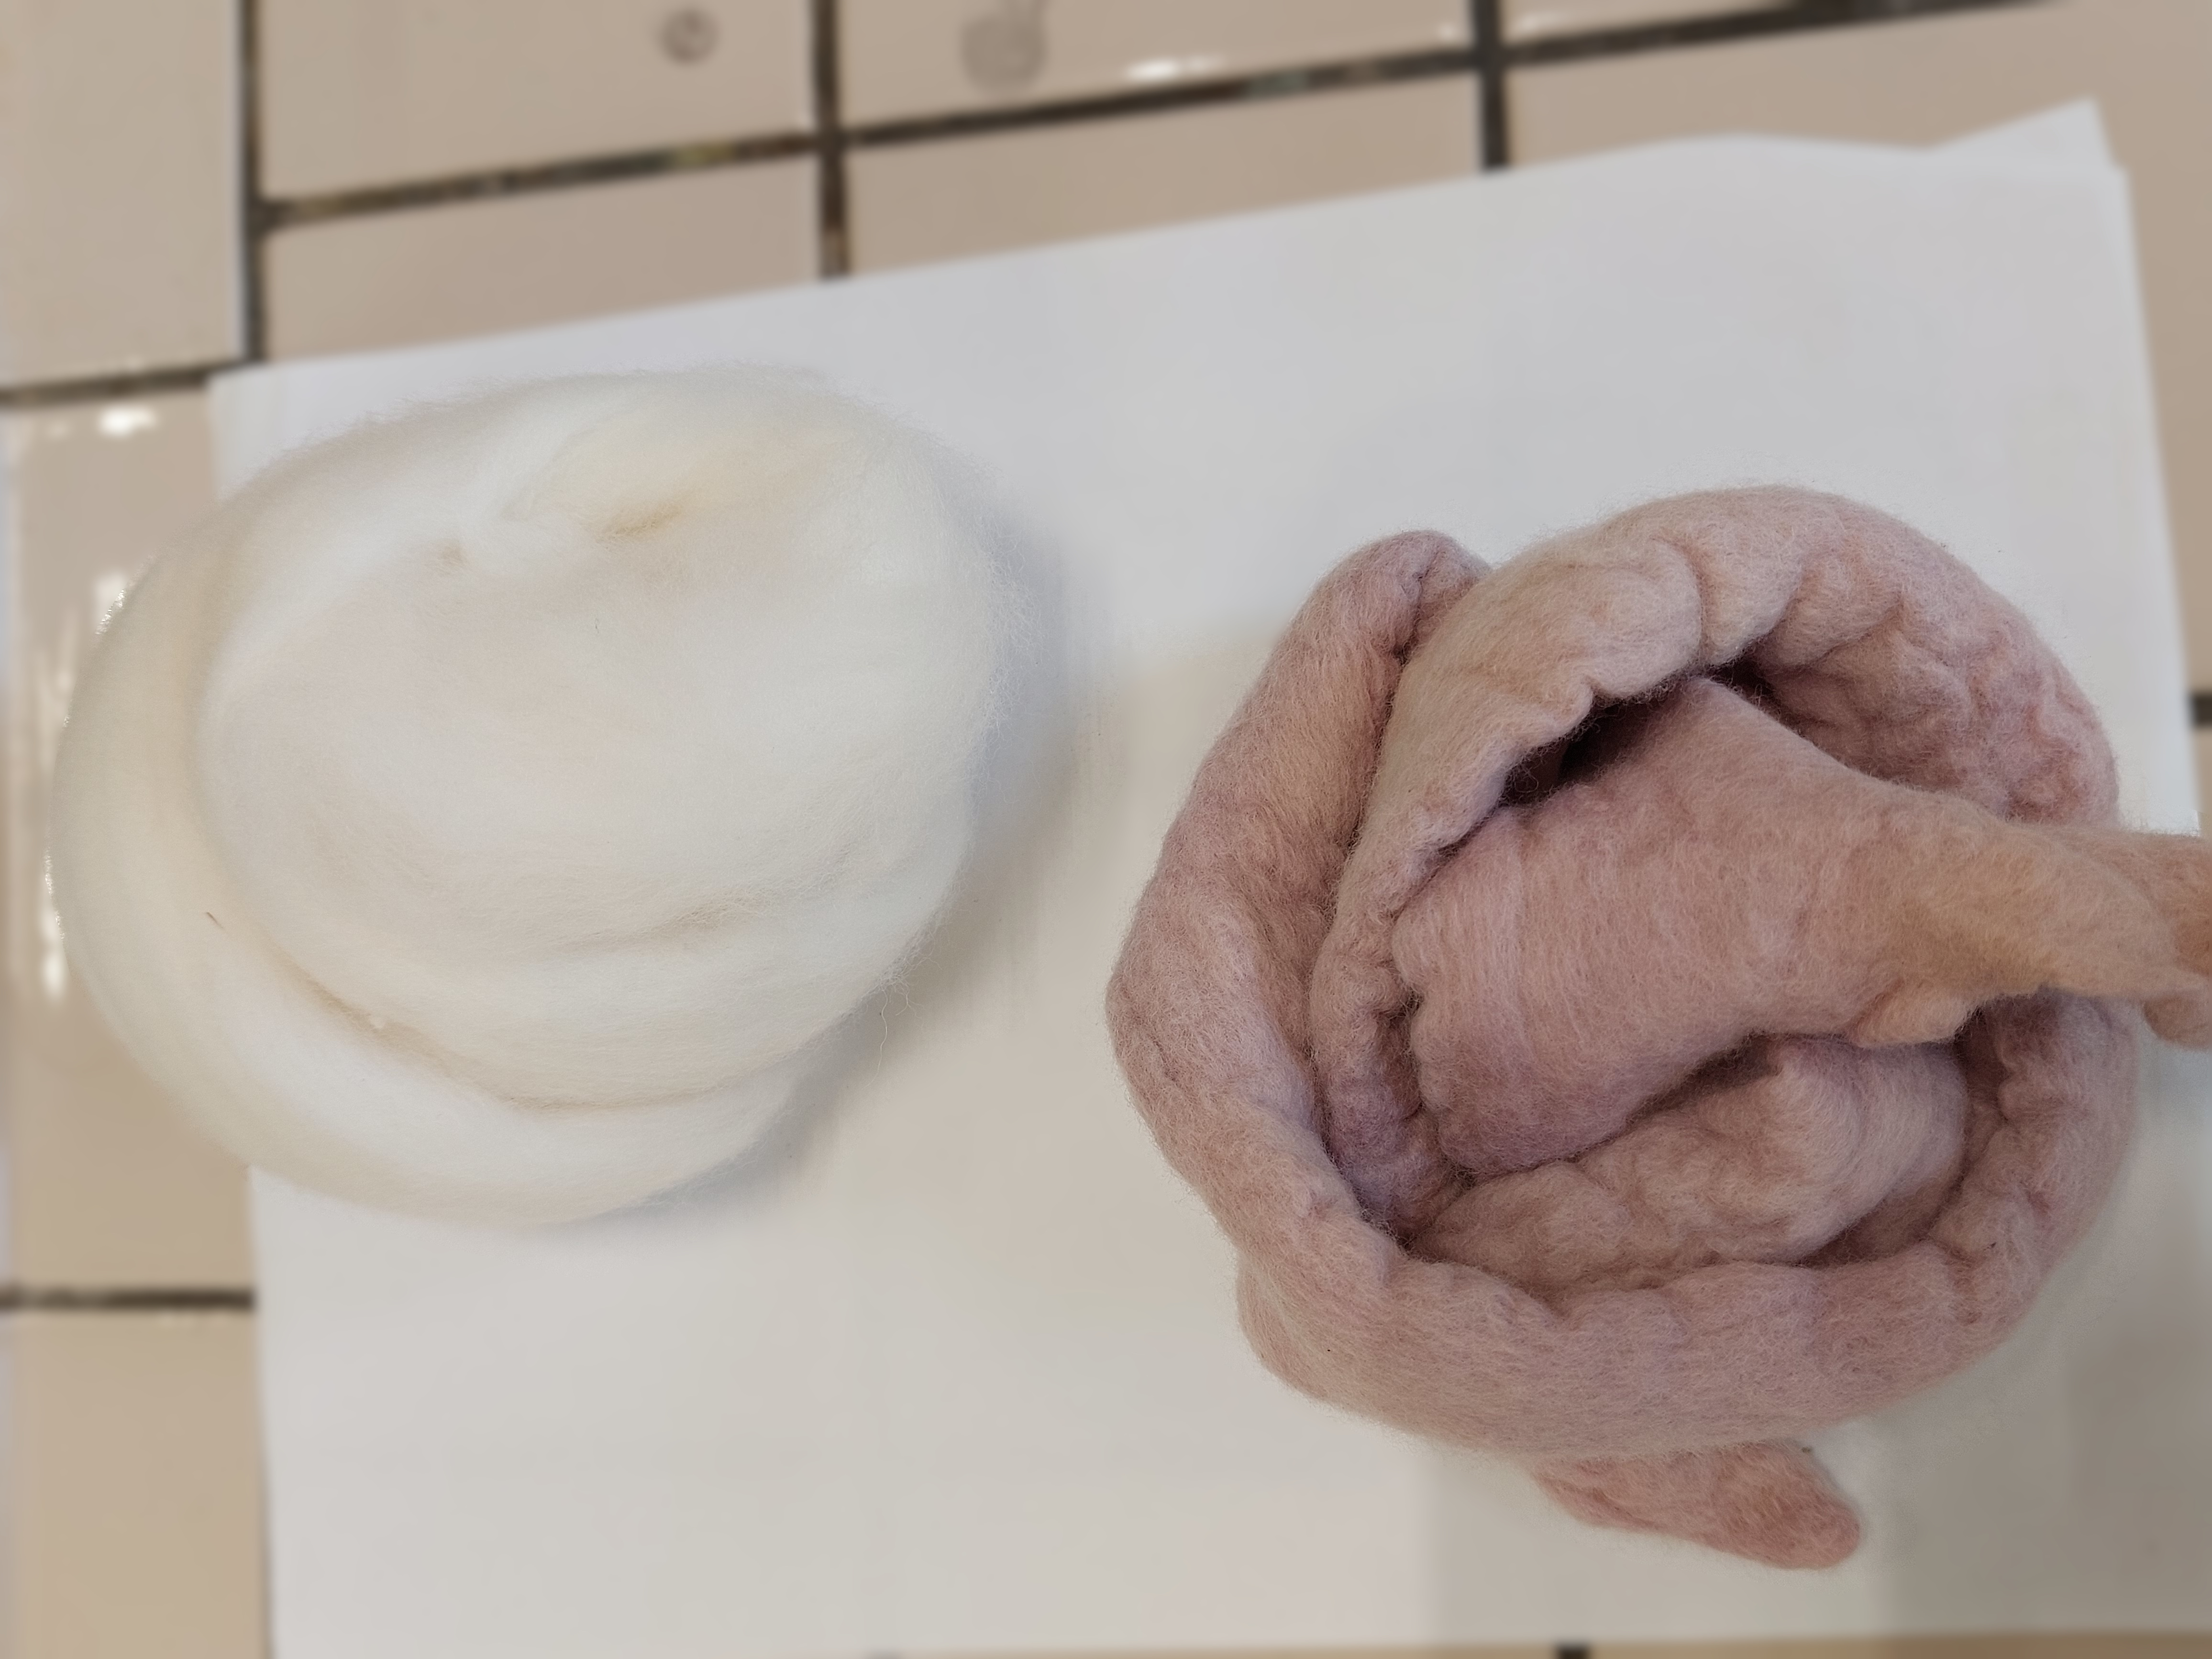
Appearance of the wool before extraction: White colour, soft, crimps or not
-
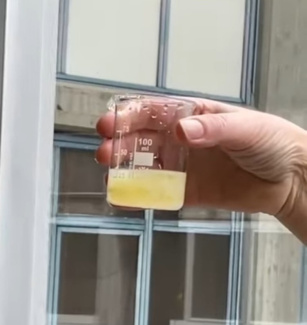
Appearance of the wool after the extraction period: The wool takes on a dark colour and a gelatinous appearance.
-
Appearance of the extraction solution at the end experience: The clear and colourless solution at the beginning becomes dark and cloudy.
Discussions
1. Do you think that a chemical reaction has taken place that has somehow modified the wool?
The changes observed in appearance of the fibres, both in terms of colour change and turbidity of the solution, indicate that chemical reactions have occurred.
2. Can you make assumptions as to what kind of changes could have occurred at the molecular level?
By extracting the keratin with NaOH, denaturation occurs with a partial degradation of the protein.
Keratin can be extracted without degrading it, but the extraction process is rather long, and therefore a difficult proposition in laboratory setting. Non-degradative extraction is carried out using sodium metabisuphfite, which breaks the sulphur bridge bonds, and urea (denaturing agent).
After extracting the keratin with a solution of NaOH, the present protein will be flocculated in the solution, using different substances also in common use.
By decanting and drying you can obtain the keratin powder. Another method is centrifugation, which is faster but a centrifuge is needed. Decanting and drying is slower but can be done in every school.
Materials
- Keratin solution in NaOH
- Ethanol (CH3CH2OH)
- Acetone (Dimethylketone, CH3-CO-CH3)
- Citric acid 6% (Ac. 3-carboxy-3-hydroxy-1,5-pentanedium, C6H8O7)
- White wine vinegar
- Lemon juice
- Pipettes
- Test tubes
- Petri dish
- Protective goggles
- Protective gloves
Method
Safety first: Wear protective gloves and goggles.
Strain the lemon juice. It is necessary to filter the lemon juice to try to reduce the turbidity.
Citric acid in 6% solution has a pH value similar to that of lemon, therefore, you can use a citric acid solution instead of lemon juice.
We have chosen to use both to show that substances that appear daily on our dinner table (lemon, vinegar), can be used as chemical reagents. It is also interesting to observe the layering of the protein with lemon juice.
Take five tubes, mark them and add about 10 mL of different solutions in each one: ethanol, acetone, citric acid, vinegar, lemon juice.
Add about 1-2 mL of the extraction solution drop by drop to each tube. Enter the observations in a table.

Then pour the contents of each tube into a petri dish and let it evaporate until it is completely dry. Observe against a dark background and report your results in a table.
Appearance of the solutions
Appearance after complete drying:

Discussion
1. What does the term flocculation mean?
Chemical-physical process in which the solid phase of a colloidal system tends to separate forming flakes in suspension.
2. What is the explanation for the behaviour of keratin in different solutions?
Precipitation (or protein flocculation) can be carried out in different ways:
- Induced by pH: by changing the pH of the solution, for example by adding acetic acid, to get close to the isoelectric point (pI or pHi) of the protein.
- Solvent variation: the dielectric constant of a solvent has an influence on the electrostatic interactions between protein, leading to flocculation (hydrogen bond formation). A weak dielectric constant (such as in ethanol or acetone) tends to reduce the solubility of a protein.
The behaviour is different if flocculation is induced by pH or by solvent variations.
You can proceed to use the extracted keratin to make your own hair conditioner! Find the teacher guidelines below. [4]
Preparation of the keratin
Safety first: Put on protective goggles, a lab coat and gloves.
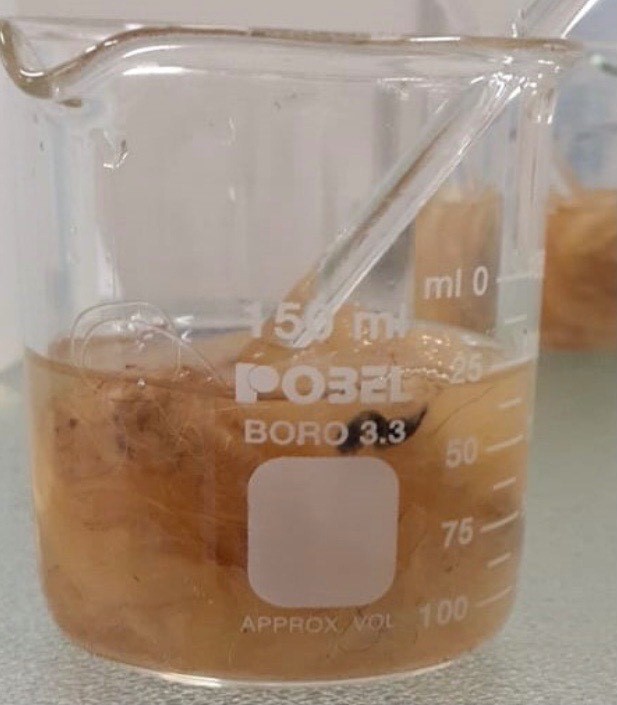
1. Weigh about 5 g of raw wool into a beaker and introduce 150 mL of 1 mol/L NaOH.
2. Extract the keratin as described in the part Extraction of keratin.
3. Transfer the extract into an Erlenmeyer flask by filtration.
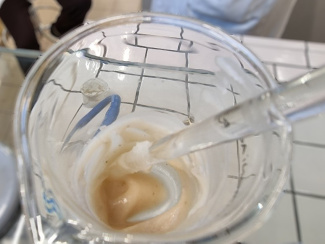
4. Under a hood, pour acetic acid (CH3COOH) drop by drop into the extract until precipitate crystals are observed (keratin flocculation).
5. Separate the keratin crystals from the solution in which they are contained by centrifugation. If you do not have a centrifuge at school, you can separate the solid part from the solution by decantation as described in the part Flocculation and precipitation of wool keratin. The decantation process is slower than centrifugation.
6. Transfer the keratin to a watch glass.
7. Allow to dry.
Keratin conditioner
For 50 mL of the product, weigh into a beaker:
- 7.5 g of a 25% m/V keratin solution in glycerine,
- 3 g Cetyl alcohol,
- 7.5 g Shea butter,
- 7 g Almond oil and
- 7 g Citric acid (preservative).
Place the beaker in a bain-marie and heat until the ingredients have melted.
Add 1-2 drops of essential oil.
Transfer the resulting product into a container.
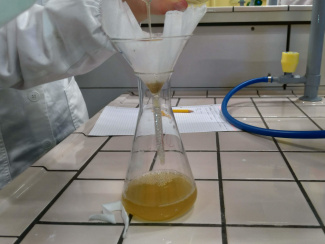
Transferring the extract into an Erlenmeyer flask by filtration
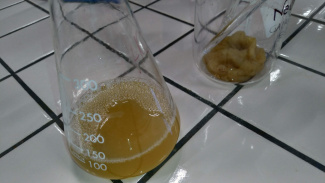
The filtered keratin extract in an Erlenmeyer flask
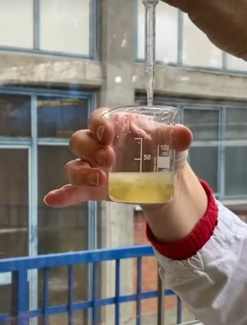
Pouring acetic acid into the extract until it flocculates (1)
Pouring acetic acid into the extract until it flocculates (2)
Pouring acetic acid into the extract until it flocculates (3)
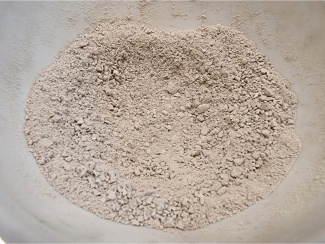
Dry keratin powder
The hair conditioner in a beaker
Dyeing the wool
A simpler and safer, yet interesting experiment suitable for younger students is to dye the wool using natural colourants.
The activity achieves two purposes:
- To make waste wool more aesthetically pleasing because it is dyed and therefore reusable.
- To explore the use of natural dyes for textile fibres.
Natural dyes are extracted from plants, marine invertebrates, algae, as well as production from bacteria and fungi. They can be purchased in extract or powder form, and a considerable number of different shades can be obtained from each plant.
Here you find teacher instructions for two procedures: The first one is very easy and can be followed using turmeric root or powder to dye the wool. The second one is quite complicated using mordant and red cabbage.
You also find videos with examples of red cabbage containing anthocyanin and turmeric root containing curcumin.
- Plant: Curcuma longa
- Part used for the tincture: crushed root
- Colouring: curcumin

Materials
- Water
- Beaker or pot
- Wool or other natural fibres
To prepare the dye, the chopped turmeric root must be used in an amount equal to 50% of the weight of the dry yarn.
Procedure
- Take the wool, weigh it and immerse it in water at room temperature (use the beaker or a pot of water). Use water that can cover the wool.
- To prepare the dye, the chopped turmeric root must be used in an amount equal to 50% of the weight of the dry yarn. Otherwise, turmeric powder can be used directly in an amount equal to 5-10%.
- If you have only turmeric powder available, you have to calculate the weight of the powder in relation to the wool to be dyed.
- Dissolve the powder in water.
- Add the wool.
- Boil everything for 20-30 minutes.
- Plant Brassica oleracea convar. capitata var. rubra
- Part used for dyeing: leaves
- Dye: anthocyanin
The weight of the cabbage must be about 60 times the weight of the tissue.
Materials
- Gloves
- Red cabbage
- Alum powder (hydrated double aluminium potassium sulphate salt)
- Potassium hydrogen tartrate (Rock alum (aluminium potassium sulphate, which is a real etchant) is used at 10-15% by weight and potassium hydrogen tartrate which softens the hardened wool from the etching by 5% The percentages refer to the dry wool to be treated. That is, 100 g of dry wool requires 10-15 g of alum and 5 g of potassium hydrogen tartrate.)
- Water
- Washed wool
- Stainless steel pot
- Stainless steel mixing bowls
Mordanting the wool
This process acts on the wool, or generally on the natural fibre. The water-soluble dye substances in the bath are fixed permanently and indelibly on the fibres.
The process is known as mordant dyeing. It is the most important process of preparing fibres to accept colour – it helps to ensure the most durable and long-lasting colours. In the case of red cabbage, if you don’t mordant the material you are planning to dye naturally, the colour will wash out when you finish the dye process.
This is done as follows:
- Soak the previously washed wool in water three minutes before starting the
- Weigh alum and cream of tartar in the above proportions.
- Put about 200 mL water to heat in a small
- Add the 15 g of alum and 5 of cream tartare in the 200 cc of water and stir to dissolve.
- Fill 2-3 l of water for every 100 g of dry wool into a larger pot, add the etching solution and immerse the wet wool.
- Simmer for 1 hour and stir frequently.
- Allow the wool to cool, slowly and naturally, by leaving it in the etching solution.
- Rinse the wool very well with cold or warm water.
Remember that the containers used must be made of stainless steel. Aluminium is not recommended as it can alter colours.
Procedure for dyeing
Cut the cabbage into thin strips. Heat a pot of water to 60°C.
Place the cabbage in the pot and warm up for about 30-40 minutes to extract anthocyanins from the vegetable. If the water begins to boil, take the pot off the heat for a moment. Boiling the cabbage will destroy some of the potential dye!
- Strain the cabbage cooking liquid and pour it into another pot.
- Place your mordanted wool in the pot containing dyed water, gently pushing down on the wool to submerge it. Carefully squeeze the wool in the pot to make sure all the fibres absorb the dye water.
- Set the heat to medium-low, letting your wool soak in the pot for an hour - maybe longer if you want to try getting a deeper colour. It’s very important you don’t boil the water during this step.
- Then remove the wool from the colour bath and rinse it gently.
- Spread and let the wool dry overnight.
The colour obtained from cabbage varies according to pH and tissue.
At acid pH, a reddish colour occurs, while at basic pH, a greenish blue colour occurs.
In our case, the wool becomes light purple as you can see in the photo.
Recovery of heavy metals from water
An example of an alternative use of wool is the ability to adsorb and recover metal ions from water. You can quantify the ability of wool to adsorb copper using a strips kit or simple colorimetric series.
In recent years, the various applications of wool have been studied. In particular, it has been seen that wool might be used to clean up soils contaminated by heavy metals. Its use in this sense would have a dual purpose: to help in the disposal of excess or waste wool, and to use a completely natural material.
Material needed
- Wool
- Copper sulphate solution (CuSO 4(aq) 200 mg/l)
- 2 Copper test strips as required
- 2 Beakers
- Glass rod
- Gloves
- Protective lab coat
- 7 test tubes
- Copper assay strips
Procedure
Safety first: Wear protective goggles and a lab coat
Pour 20 mL of the copper sulphate solution into 2 beakers.
One beaker will be the reference. Add a piece of wool into the second beaker and stir so that it is soaked by the solution and wait a few hours.
Observe any colour variations in the wool and in the solution.
The white colour of the wool allows the adsorption of Cu2+ ions to be noted.
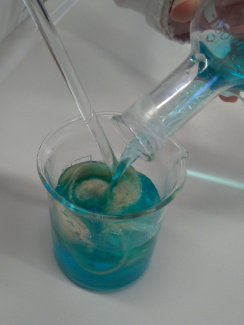
Filling a beaker with wool and copper sulphate solution
Stirring wool and copper sulphate solution a beaker
A beaker with wool and copper sulphate solution
Use a copper assay strip to quantify the amount of copper in each beaker.
Put the strips into the solutions, wait about 20 seconds and observe the colouring.
Thanks to the change in colour of the different solutions, the change in copper concentration in the presence of the wool can be determined.
Results
In the beaker without the wool you can obtain an intense violet colour on the strip, indicating a high copper concentration.
In the beaker with the wool you can obtain a red colour on the strip, indicating a low copper concentration.
- Solutions: Copper sulphate solution
- Strip colouring: Violet
- Solution concentration: 200 mg/l
- Solutions: Solution of copper sulphate and wool
- Strip colouring: Very light pink
- Solution concentration: 10-20 mg/l (the colour and consequently the concentration also depend on the reaction time)
To measure the amount of copper in the solution, you can proceed using semi-quantitative test strips for copper ions, and prepare a colorimetric series as follows.
Using the copper(II) sulphate solution provided, prepare five tubes of diluted copper(II) sulphate, according to the following table. Ensure the solutions are well mixed.
| Tube number | 1 | 2 | 3 | 4 | 5 |
| Volume of copper(III) sulphate solution [cm3] | 8 | 6 | 4 | 2 | 0 |
| Volume of purified water [cm3] | 2 | 4 | 6 | 8 | 10 |
Pour a 10 cm3 sample of the copper solution from your two beakers (Experiment A, the beaker with the wool and the other one without the wool) into two other test tubes.
Compare the colour of your tube from the experiment A (absorbing Cu2+ from wool) with those from the colorimetric series. Which one matches the colour best?
Discussion
1. What colouring did the wool take on after being soaked in copper sulphate? Why?
The wool appears grey/blue in colour because it has adsorbed Cu2+ ions.
2. Calculate the amount of copper absorbed by the wool during the incubation time.
The calculation can be made approximately by comparing the colours of the strips.
3. Do you think that time is a variable to be taken into account when assessing the wool’s absorbing capacity? How could you verify this?
Repeat the experiment, dipping different strips into the solution at different times.
4. Design an experiment to measure the amount of wool needed to absorb a specific amount of copper, or repeat the experiment, using beakers with different amounts of wool, previously weighed in the same concentrations of copper.
Here is another neat way to quantify copper ions using a simple smartphone from our teaching material "Coloured Chemistry with Smartphones".
Authors of The 3 Rs and the Products of the Future: Anders Florén (SE), Iro Koliakou (GR), Maria Zambrotta (IT)
Links to forward to your students
Green hydrolysis conversion of wool wastes into organic nitrogen fertilisers LIFE12 ENV/IT/000439. LIFE+GREENWOOLF 2016 (July 2022).
Claudio Tonin, Ricerca e innovazione per nuovi (ri) utilizzi della lana: il progetto LIFE + GREENWOLF,48 CNR ISMAC, 2015. (July 2022)
https://www.textileschool.com/330/microscopic-appearance-of-fibres (October 2022)
Dr, I. Fergani “Proprietes physicochimiques des proteines” Universite 3 Constantine Faculte de medicine department de medicine 1 ere annee medicince 2017 (July 2022).
Further information on sheep numbers and wool production can be found here: "World sheep numbers & wool production" IWTO Market Information Ed.17 (July 2022).
Share this page